
 Printer-friendly PDF
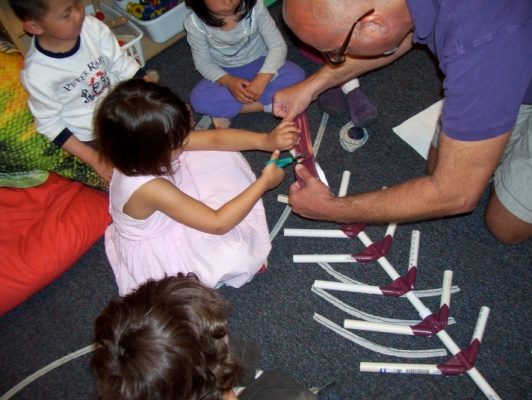
Scott Brouette
Western Illinois University Preschool Center
Macomb, Illinois
The University Preschool Center is located on the campus of Western Illinois University in Macomb, Illinois. The children are ages 3-5 years and are children of university faculty, staff, and students. Most of the 21 children attend full days, 5 days per week. The center is open from 7:45 a.m. until 5:00 p.m. Monday through Friday during the regular university academic schedule. The classroom has one lead teacher, another full-time teacher, a full-time teacher’s aide, and several student aides. The lead teacher implements project work with additional assistance from the other adults in the classroom. The Fish Project began at the end of January 2010 and continued until the beginning of May 2010.
Phase 1. Beginning the Project
When they returned to the classroom after winter break, the children discovered that our fish tank contained many new fish. It was evident to the teachers that the children were very excited about the new fish. Much of the children’s attention during the first week following the break was focused on the new fish in the tank. While discussing possible new project topics during morning meeting, several children suggested the topic of fish. There were two other topics of interest—playgrounds and transportation. We do a lot of voting in our class, so the children decided to vote on the topic, and fish won with a tally of 9 votes.
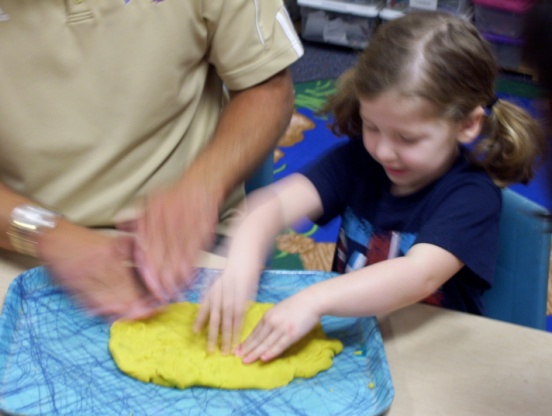
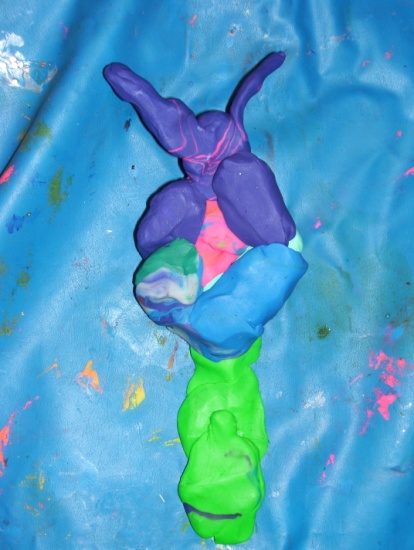
With the adults’ encouragement, children began sharing many stories about fish in their lives. The children are always ready to share stories during morning meeting. Once a topic is chosen, there is no stopping the sharing of ideas! When one of the children suggested that we build a fish, the group also began discussing ways to construct a fish. Eventually, the children settled on using play dough to form a fish body, but then they wondered, “What shape is a fish’s body?” While discussing this question, the children had several ideas. Some thought that fish bodies were round, while others thought they were straight. One child said they were oval, and everyone agreed. We used our hands (and eventually a rolling pin) to shape the dough to make the fish. One 4-year-old girl worked particularly hard to shape the play dough body (Figure 1). The children used scissors to cut construction paper into fin shapes to be attached to the body. A 4-year-old boy used his fingers to form indentations in the play dough body to represent scales. The completed fish had two fins and a tail made from paper, whiskers (like a catfish) made from yarn, a strip of paper attached with glue for a mouth, and a googly eye.
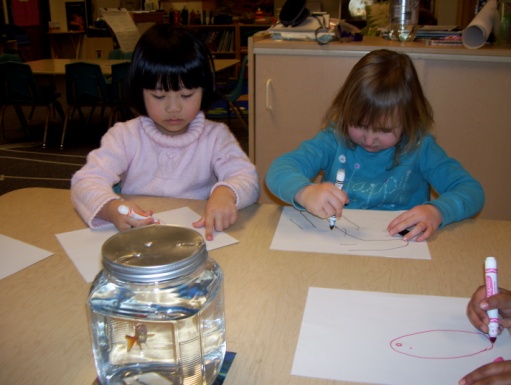
On another day, we gathered several children to sketch fish from memory. The children used markers to draw fish without looking at a model. All of the children completed several different sketches, adding more details with each effort. Several children sketched more than one fish on each piece of paper. Another group of children gathered to observe and sketch a live goldfish (Figure 2). During their observations, they counted one fin on the top, four on the bottom, and two fins on the tail.
Soon afterward, the children dictated an idea web, drawing upon their prior knowledge of fish:

As the children continued their discussions and representations, it became clear that they were very interested in the physical aspects of fish. The teachers were amazed at the information that was already a part of the children’s prior knowledge and predicted that the project would continue to move toward finding out more about the physical characteristics of fish.
During morning meeting, the children generated a list of questions for investigation. Once the ideas started to flow, the group generated 27 questions that they wished to answer during the project. Some questions were very specific, while others were more general in nature.
- Why do fish have a mouth?
- Do fish climb?
- How do fish sleep?
- Do fish eat meat?
- Are there blue fish?
- Are there purple fish?
- Why are fish different shapes?
- Why do people go fishing?
- Why do fish have different skin?
- What do fish eat?
- Why do people eat fish?
- Why don’t fish have hands?
- Do fish play?
- What kinds of fish live in the Philippines?
- Why do fish have tails?
- Why do fish have eyes?
- Why do fish have fins?
- Why do fish have skin?
- Why do fish swim?
- How do fish swim?
- Why do some fish have stripes?
- Why are fish different colors?
- Why do fish have bones?
- Do fish have blood?
- Do fish swim all of the time?
- Why do fish have two eyes?
- Do fish eat blood?
As the teachers had predicted, many of the questions concerned the physical characteristics and habits of fish. In our class, each question is answered by the group of children that chooses to be part of the investigation on a particular day. Possible ways to find the answers are discussed thoroughly within the small group. For example, the children discuss possible experiments or other avenues for researching answers to their questions. Typically, the teacher asks the children, “How can we find the answer to the question?” or “What can we do to find the answer to the question?” The children plan and implement all of the research. The teacher is there to provide support and materials for the investigation and experimentation.
Phase 2: Developing the Project
Many of the investigations in the Fish Project were conducted through hands-on exploration and experimentation with the actual fish in our classroom.
Investigating the Question “How Do Fish Swim?
How do fish swim? The teacher and one child set out to find the answer to this question. The child thought we should check in one of our large research books (Figure 3).
She found an encyclopedia with a photo of a starfish on the spine and thought we might find the answer in there. By looking in the index, we found the pages with information concerning fish. Together we read through the information. We found many interesting facts. We discovered that fish have a swim bladder that, when filled with gas, helps them move up or down in the water. But we found no other information about how fish swim. Several other children joined the group when we decided to examine the fish swimming in our aquarium. The children could see right away how they were swimming, and they came to several conclusions:
- They move their tails to swim.
- They move their whole body from side to side.
- They use their muscles to move their body.
- They are flapping their fins!
- The faster they move their tails, the faster they go.
Through our research, we also discovered more about the swim bladder. It works like a balloon. When it is filled with gas, the fish can float up in the water. When the gas is released, the fish can float downward. By regulating the gas in the bladder, the fish can maintain a constant level in the water. We decided to do some experimenting of our own. The children found some of our toy fish, and I provided balloons. We filled one balloon with air and attached it to a fish. Next, we submerged the fish and let it go to see what would happen. The fish and bladder popped up out of the water very quickly. Next we tried the same experiment with an empty balloon “swim bladder.” The fish still floated to the surface but not as quickly. Because the toy fish were made out of plastic, which floats, we decided to try something that did not float. We placed a swim bladder inside a large glass jar and, without putting a lid on the jar, submerged the whole thing so that water entered the jar. The jar normally would have stayed submerged because of the water in it, but with the swim bladder inside, it also floated right to the surface. We found that a swim bladder really does work!
Investigating the Question “Why Do People Go Fishing?”
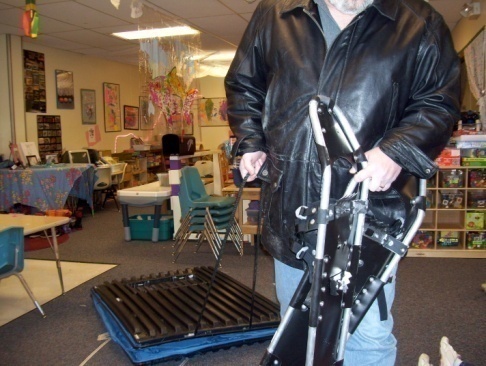
Another of the children’s questions for investigation was “Why do people go fishing?” We invited the husband of one of the teachers to visit the classroom to show us all of the equipment he uses to go ice fishing and to answer the children’s questions about fishing. The children were very eager to see the fishing equipment and had many questions. One child asked, “Do you need special shoes to walk on the ice?” The visitor showed the children his snowshoes (Figure 4). He explained that the large shoes buckle on just like a pair of sandals to help him walk on top of the deep snow. On the bottom of the snow shoes were three rows of sharp grippers that prevented him from slipping and falling on the ice and snow.
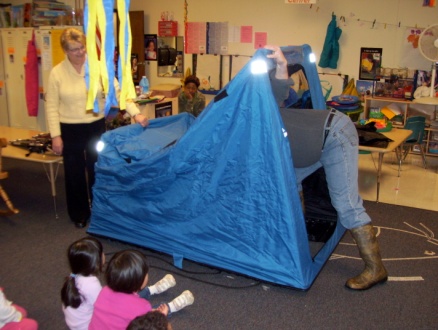
Another child wanted to know, “How do you put the tent on the ice?” The fisherman explained that the tent has a rope attached, which allows him to pull it out onto the ice and snow, just like a sled. The tent folds open and can be pulled up to its full height. Once the sides are extended, he can insert the center poles to make the tent taller (Figure 5). In the floor of the tent, there are two trap doors that open so he can drill holes in the ice.
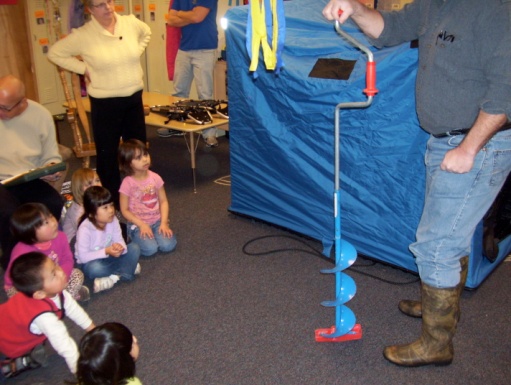
One of the boys asked, “Do you skate on the ice to make the hole?” The fisherman explained that he uses a tool called an auger (Figure 6), which has a sharp blade on the bottom. When he holds the handle and twists the tool, it drills a hole in the ice. The excess ice is pushed up the corkscrew and falls to the side of the hole. Once the hole is finished, he uses a large spoon to scoop out any remaining slush.
Several children queried, “How do you catch the fish when the pole is in the water?” He explained that the fishing pole is very small so that it fits in the tent. On the end of the fishing line are a tiny hook and a bobber that floats at the surface of the water. He puts a wax worm onto the hook and drops the hook through the hole into the water. Wax worms are small white larvae that fit perfectly on the tiny hook. The children crowded close to see and touch the live worms (Figure 7).
The children were able to explore the fisherman’s ice fishing equipment. Our expert visitor even brought in some of his recent catch. The children eagerly examined the fish, caught locally in Lake Argyle.

Finding Out if Fish Eat Meat
Do fish eat meat? A small group of children gathered to answer this question. Initially, the children wanted to conduct a survey (which seems to be one of their favorite activities), but after some discussion in the group, they decided that a survey would not give an accurate answer—it would only tell us what other people guessed, but it would not tell us whether fish actually eat meat. After some discussion, one of the 3-year-olds suggested doing an experiment to test our fish. But how might they do that? Another child exclaimed, “We could feed the fish some meat!” (Note: The teachers knew that the classroom fish, which were goldfish, could eat meat because some of their usual food contained ground fish and shrimp. If the classroom fish had been plant-eaters, the teachers would have asked the children to answer their question another way.) We searched for some meat that could be crumbled into tiny pieces, because our fish have very tiny mouths. We found some thinly sliced turkey in the refrigerator. After carefully tearing the meat into tiny chunks, we dropped a few pieces into the fish tank. The fish went for the meat immediately and ate it very quickly. So fish (at least ours) do eat meat! (Note: It is essential to do some research on your own or with the children before putting any foreign foods into the fish tank. If the fish had not eaten the meat, the teachers would have immediately removed it. Uneaten meat might spoil and harm the aquarium environment.)
Investigating Why Fish Have Different Skin and Different Coloring
Why do different kinds of fish have different skin and different coloring? To answer this question, we began with the skin. Some children thought that fish have different kinds of skin so that they can swim better. We began discussing the difference between rough and smooth skin. The children felt their own skin, and it was smooth. The bottoms of our shoes were rough. I wondered aloud about what kind of skin would make swimming easier? One child thought rough skin would be better; the rest of the small group believed that fish could swim more easily if they had smooth skin.
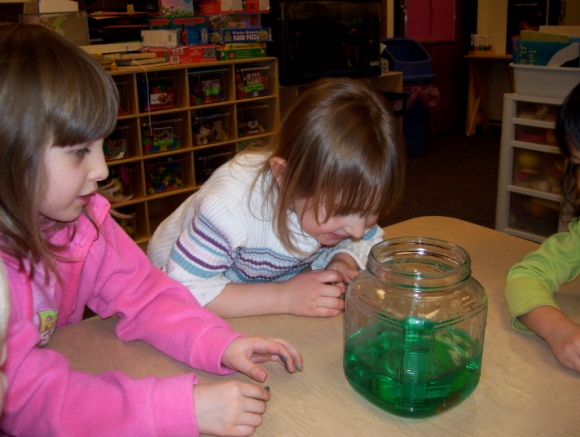
I started a discussion with the group about why fish are not all the same color. “They have different colors because there are different kinds of fish,” one girl declared. The other children agreed, but could that be the only reason for different colors? We began sharing other ideas. One child mentioned that chameleons change colors when they get onto something. I asked, “Why would they do that?” She thought about it for a couple of minutes; it seemed as though she knew why they change color but was not able to articulate the answer immediately. Finally she exclaimed, “They turn different colors so they can hide!” The children immediately thought that fish might have different colors in order to help them hide, so that seagulls or other fish don’t see them and eat them. This same child had an idea for an experiment. We could put some of our small plastic fish into water dyed a matching color to discover if they were difficult to see. It worked! The toy fish was very difficult to see in the container of color-coordinated tinted water (Figure 8).
The plastic fish that did not match the water were much more visible than those whose color was the same as the water; therefore, the non-matching fish would have been more vulnerable to attack. The children concluded that fish are most likely different colors so that they can hide in their environment.
Investigating Whether Fish Climb
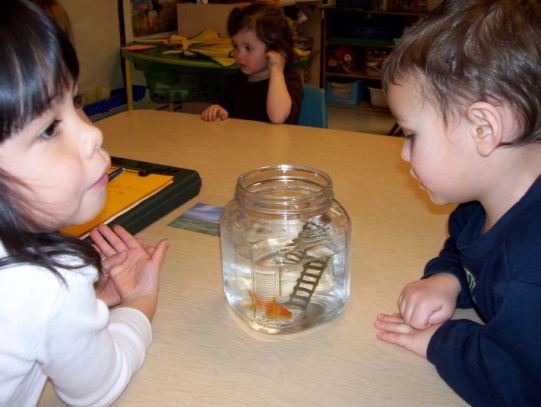
Do fish climb? The children who determined the answer to this question already knew that fish could not climb. They stated that, unlike frogs that have sticky feet, fish do not have legs for climbing, and their fins do not help them climb. To be certain, the children decided to test one of our goldfish. First, they needed to find something that was climbable. They found a small plastic ladder that was in with the Lego blocks. We secured the ladder to the bottom of our small observation jar and filled the jar with water from the aquarium. Then we caught a fish from the aquarium and carefully placed it in the jar. Observations seemed to confirm the children’s earlier assumptions—fish do not climb (Figure 9). They use the swim bladder to move up and down in the water.
Several of the children’s questions could not be answered through hands-on exploration. The children discovered the answers to these questions through research on the computer. For example, one child who is from the Philippines asked, “What kinds of fish live by the Philippines?” We found many different fish that live in the tropical waters around the Philippine islands. Many are butterfly fish or angelfish. In answer to the question “Why do fish have two eyes?” we found that having two eyes lets fish compare light that is coming at them from two different directions. This helps the fish move toward and away from light sources with accuracy. In answer to the question “Are there Queen fish?” we found that, yes, there are queen fish, and they live off the coast of Baja California. Throughout the remainder of the project, most of the other questions were answered through hands-on research.
During the investigation, the children continued drawing fish from memory with one of the teachers, and some of the children used polymer clay to create 3-dimensional fish.
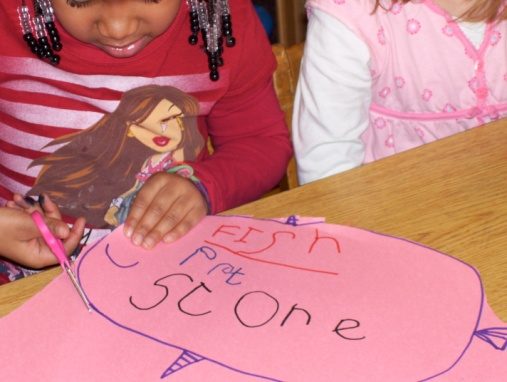
Planning a Fish Pet Store
Several children mentioned that they had seen fish at the pet store. The children began discussing different aspects of pet stores that they had visited. When I asked how we could incorporate this knowledge into our project, the children decided to create a Fish Pet Store. Several children gathered to compile a list of materials needed to complete the store:
- Shopping cart
- Toy castle for tanks
- Broken ship for tank
- Shelves
- Money
- Bugs for fish
- Smocks for workers
- Weeds for tanks
- Fish
- Rocks
- A table
- Cash register
- Fish books
- A sign
- Fish tanks
- Fish food
- Water
- Bags
- Shells
- Log for tank
- Name tags
- Open/Closed sign
One afternoon, the children consulted the list of supplies needed for the Fish Pet Store. With the adults, the children collected all of the items that we would not need to make ourselves.
Constructing the Fish Pet Store
After the children and teachers finished collecting materials for the pet shop, it was time to start construction (Figure 10). At my suggestion, the children discussed what would need to be removed from the dramatic play area to accommodate items for the fish pet store. The class voted on several issues, such as which furniture to remove and where to place materials. All of the materials collected for the store were placed on the shelves or in the cabinets. When the Fish Pet Store was completed, the children busily explored and shopped in the new store. The store remained open in the classroom for the remainder of the investigation, about 3 weeks.
Phase 3: Concluding the Project
To conclude this investigation of fish, the children chose to design and construct a large 3-dimensional model of a fish to share what they had learned about fish. They used the observation and drawing skills they learned during our investigation. The children developed a plan by listing all of the body parts required to complete the model—an oval body, a tail, two eyes, a mouth, a pointy nose, a swim bladder, a heart, a brain, seven fins, two gills, teeth, a tongue, bones, skin, muscles, blood, and scales. They decided that once the construction was complete, they would add colors, stripes, and polka dots.
Getting Started on the Model
During morning meeting, the children and the teachers began discussing how to start constructing the model of the fish. Several children remembered that the bones were the strongest part of the fish. This realization prompted the children to start with the bones. So a small group of children chose to tackle this step. Immediately, one child suggested using the white pipes (large PVC pipes) in the sandbox. After inspecting the PVC, the children decided that those pipes would be too big, but some smaller pipes were stored out in the hall closet. Upon investigation, the children found these pipes to be perfect for the bones. To see what fish bones look like, one child suggested checking the computer. We found a photo that worked very well as our guide.
The plan for fish construction began with the internal parts of the sculpture:
- bones
- blood and veins
- muscles
- brain
- heart
- teeth and tongue
- swim bladder
Making the Skeleton
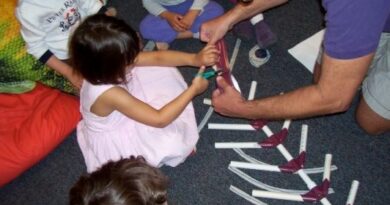
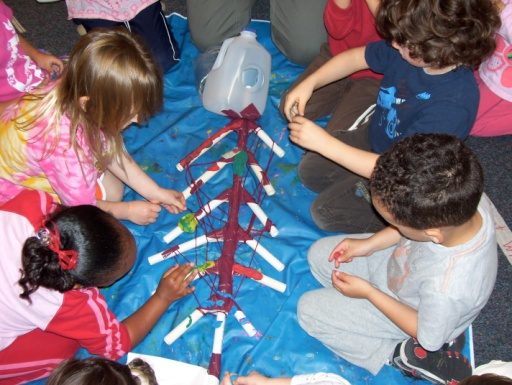
The children had already chosen to construct the skeleton with PVC pipe. We checked the photo of a real skeleton and decided to begin with the spine. We found three pieces of pipe and connected them with straight connectors. We laid out pipes to match the small bones that extended above and below the spine. A 4-year-old suggested that we attach them with tape. The children helped cut the duct tape before it was placed on the skeleton (Figure 11).
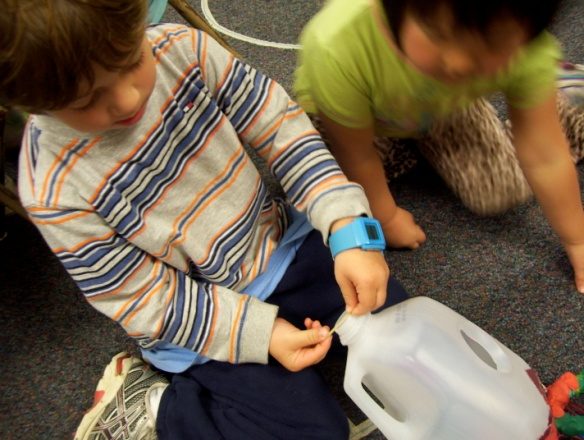
Several children exclaimed, “The tape looks like the blood!” Once the spine was complete, we worked on the skull and tailbones. The children and teachers searched the closet for inspiration, finding a milk jug that seemed perfect for the skull. After some debate, we realized that we could cut a hole in the bottom of the milk jug and slide it onto the spine. Then it could be secured with tape. We also cut holes to represent the eye sockets. We found some large coffee filters that looked like a fish tail. One of the children suggested that we cut the filter into a tail shape, but when we folded the paper, it already looked like a tail. We attached the tail to the spine with tape.
Creating Blood and Veins
A large group of children gathered to devise a way to put blood and veins into our fish model. They liked the idea of the tape representing blood, but how could we make veins? We examined the veins in our own arms and discovered that they were long thin lines. A child suggested that we use string for the veins. We searched the closet and found yarn that matched the color of the tape exactly. After some discussion, the children decided that we should tie the yarn to the bones and wrap it around the whole skeleton. The children took turns weaving the yarn through the skeleton (Figure 12). The finished blood and veins covered much of the skeleton.
Making Fish Musculature
Each day, the children are given the choice to work on the project or to choose something else to do in the room. A group of children gathered to add muscles to our fish model. It had been mentioned by a child that clay would work well to make the muscles, but I wondered aloud, “What do fish muscles look like?” Once again, someone suggested that we look on the computer. We found a diagram that exposed the muscles of a salmon. We could see that the muscles were layered and that they were an orange color. The muscles covered the bones, so we could use polymer clay to cover the bones on our model. The children warmed the clay with their hands to make it pliable and then stuck it onto the bones (Figure 13). The children carefully molded the clay onto the bones. They applied the muscles so that they were all connected, creating a layered effect. When the children were finished, the entire skeleton was covered with colorful muscles.
Brain Work!
A group of children voluntarily gathered to work on a brain for the fish sculpture. They had several ideas about materials to use. One child suggested a sponge, because it had holes, which matched his idea of what a brain looked like. Someone else suggested using paper. Yet another thought play dough with holes poked in it would work. Several children thought the brain of a real fish was round, others thought it was skinny, and one child described a little line through the middle of the brain, creating two halves. We found an image of a fish brain on the Internet. The brain was “skinny,” as one child suggested, but it also had several rounded sections. The group decided that polymer clay would work best to represent the brain, since we could match the colors to those in the illustration. One of the children thought it would be a good idea to sketch the brain before trying to use the clay (Figure 14).
Once sketching was complete, the children chose sections of the brain that they wanted to shape. The children molded the different sections of the brain so that they could be connected to form the complete fish brain (Figure 15).
I carefully inserted the brain into the skull and attached it to the top of the spine. The children took turns peering into the skull, through the eye sockets, to see the brain in its proper place.
Drawing a Fish Heart
We found a diagram of the internal organs of a fish, and several of the children decided to sketch the heart for our model. When the drawings were complete, the children voted for the sketch that looked the most like the real heart (Figure 16). When they had chosen a drawing, it was cut out and attached to the model with clear tape. The arteries leading away from the heart were attached to the existing veins, which were made of yarn.

Making Fish Teeth and Tongue
The children examined the inside of a real fish’s mouth to determine how to craft teeth for our model. They observed that the teeth were tiny and sharp. The children discussed the issue thoroughly and decided that we should make the teeth out of wood. They decided that we needed to find wood that had a sharp point and was small enough to fit into the existing mouth opening of the model. We searched together for acceptable wooden objects. The closet did not contain anything small enough, but our search of the kitchen revealed something that the children thought would be perfect—toothpicks! We broke the toothpicks into smaller pieces. The children tested each section to see if it fit into the mouth (Figure 17). After inserting a polymer clay tongue into the mouth, the children secured the teeth using a thin strip of tape, carefully sticking the teeth to the tape so that they could be folded into the oral cavity.
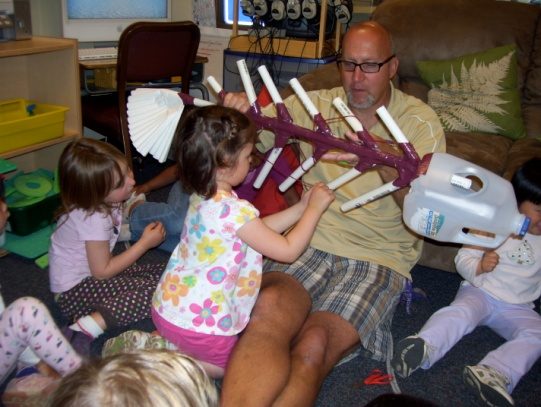
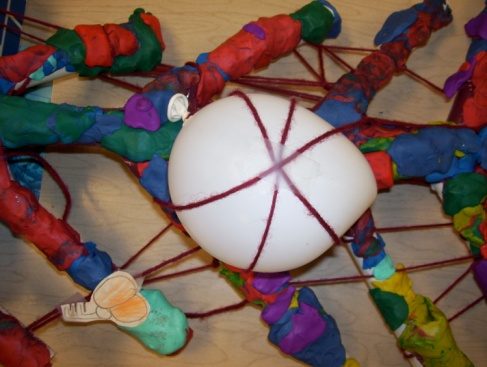
Installing the Swim Bladder
From their earlier experiments, the children already knew that a swim bladder fills with gas to help a fish float in the water; they reasoned that a balloon was the best way to represent the bladder in our model. We found a balloon and inflated it to the appropriate size. The swim bladder is located in the center of a fish, just above the heart. We used yarn to secure the bladder to the skeleton and muscles (Figure 18). The yarn represented more veins to carry blood.
Constructing the Outer Body
The children had several ideas for something strong to create the outer body of the fish model, but they could not decide on a suitable material. Searching through the closet in the hall, we found a roll of chicken wire that we could unroll and use for the body. The children helped roll out the wire so that the fish skeleton could be placed in the center. We rolled the fencing around the skeleton to form an oval body. A strong outer body now protected the skeleton and internal organs.
Putting Skin on the Fish
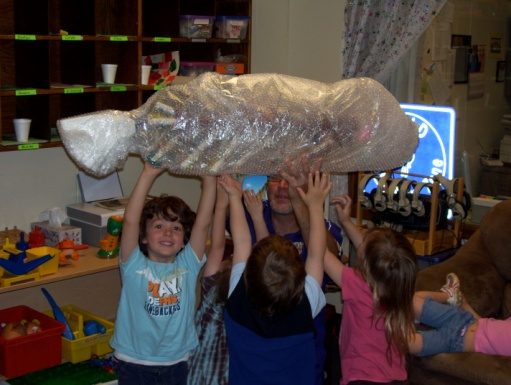
A group of children gathered to brainstorm ideas for the fish’s skin. They knew that the chicken wire body had too many holes to be the skin, so they would need another material to cover the body frame. Some children thought cardboard would work; one child suggested using play dough to cover the wire. We looked at and felt the skin of a real fish and the children discovered that the skin is kind of shiny, a little rough, and the scales were different shapes. We found a roll of bubble wrap that the children thought would work as material for the skin because it was kind of shiny and the bubbles made it a little rough. The bubbles were also shaped like some of the real scales. The children helped cover the fish body in the bubble wrap by rolling the plastic material around the frame. Clear packing tape secured the skin to the fish body. The fish model was now completely covered with scaly bubble skin (Figure 19).
As a whole group, the children discussed how to make fins for the fish model. One of the children immediately exclaimed, “We could use paper and draw the fins (Figure 20) and then tape them onto the fish body!”
After the fins were drawn, the children used scissors to cut around the edges. The fins were then glued to cardboard for added strength. The children attached the fins to the body with clear packing tape.

Explaining the Model
During morning meeting, the children created a list of fish facts to accompany the model:
- Fish swim with their muscles.
- The bones help them swim.
- They move their fins to swim.
- They move their tail sideways to swim.
- Fish swim fast to get away from sharks.
- Fish with a pointy nose can swim faster than fish with a puffy nose.
- The swim bladder makes the fish go up and down in the water.
- Air comes into the swim bladder to make the fish go up. If the air comes out, they go down.
- Fish have a heart. The heart beats to make blood go all over the body.
- The scales help a fish hide. Because they are different colors, they are camouflaged.
- The skin protects the fish.
- The gills are for breathing.
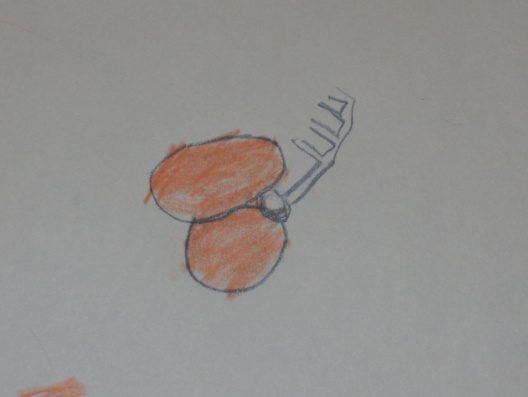
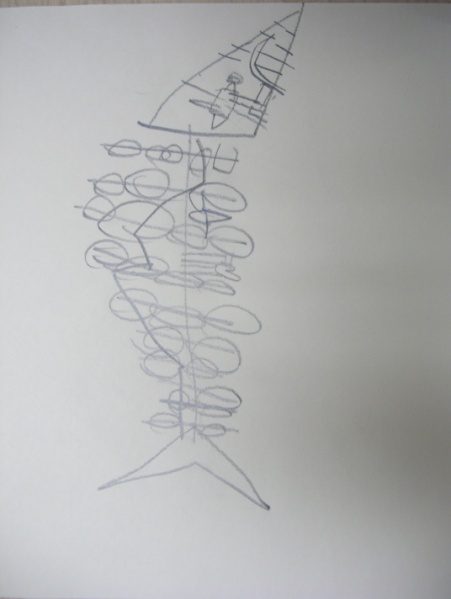
While several children worked to finish the fish model, one child worked to design and sketch a diagram identifying the parts of a fish (Figure 21).
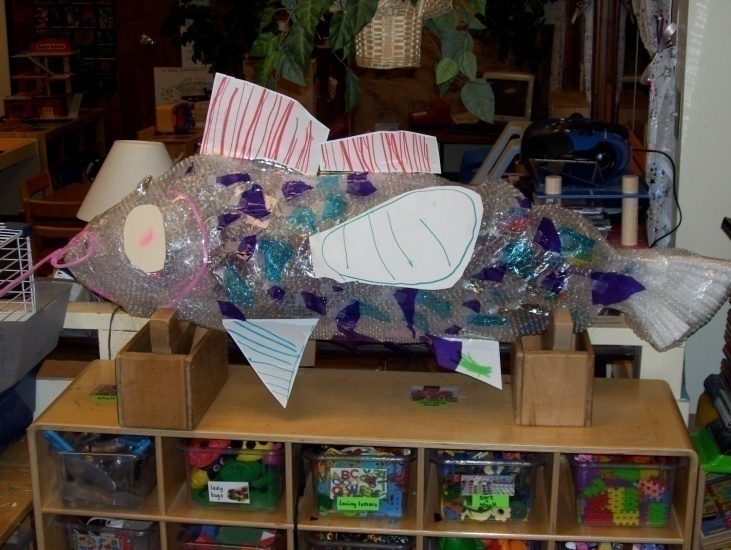
The children explored many different materials before designing the eyes, a mouth, a pointy nose, gill slits, and scales. Many children worked together to cut scales from colorful plastic wrap, tissue paper, and aluminum foil. They attached these scales to the body with clear tape. One of the children designed a pointy nose, a mouth, and gills slits using pipe cleaners. Another child examined a real fish to help him decide how to design the eyes. He then used paper and a marker to make the eyes.
The finished model (Figure 22), along with the factual information remained on display in the classroom. The children used their new knowledge of fish to explain the model to anyone and everyone who came into the classroom.
Teacher Reflection
The children’s ability to devise experiments to answer their questions was one of the most amazing aspects of this project. From the beginning, the children were able to process the information they gathered and to apply that information to a real-life situation and subsequently gain more knowledge. As the project progressed, it was interesting to see which children became involved. At the beginning, a small core group of children was coming together to answer the questions, but by the end, almost all of the children participated in the culminating activity. All of the children were able to explain the fish model to their parents, a fact that the teachers found particularly exciting.
The project topic, which was chosen by voting, had proven to be a good choice for this group of children. As the teachers expected, it did focus on the physical aspects of fish. Yet the details and attention given to the final culminating activity went far beyond the teachers’ expectations. The children were intently focused on the construction of the fish and were determined to represent their knowledge accurately for the benefit of others.
I do not know that I would do anything differently with this same project, but I do know that another group of children might (and most likely would) take the project in a whole new direction. That is why, as a teacher, I find the Project Approach so exciting!
 Printer-friendly PDF